rhel on cloud
Let’s talk about basic IT operations included in the everyday tasks range. For example, accessing VMs. As you may realize (or not) - not everyone is using immutable infrastructure. Especially when their core business isn’t IT, and they are a bit bigger than 2-pizza team. That is why today we will talk about accessing the console of Red Hat Enterprise Linux 9.3 in AWS Cloud. I will show you the 3 most useful methods - in my opinion; there are no statistics.
Initial note
Due to the fact, that I appreciate AWS CDK, all examples today will be written in TypeScript.
Additionally, I decided to use shared stacks and store VPC config separately,
as well as default instance properties.
The network is very simple, one public subnet,
one private subnet, and one NAT(default option when using subnetType: ec2.SubnetType.PRIVATE_WITH_EGRESS).
 1import * as cdk from 'aws-cdk-lib';
 2import * as ec2 from 'aws-cdk-lib/aws-ec2';
 3
 4export class SharedNetworkStack extends cdk.Stack {
 5  public readonly vpc: ec2.Vpc;
 6  constructor(scope: cdk.App, id: string, props?: cdk.StackProps) {
 7    super(scope, id, props);
 8
 9    cdk.Tags.of(this).add("description", "Shared Network");
10    cdk.Tags.of(this).add("organization", "3sky.dev");
11    cdk.Tags.of(this).add("owner", "3sky");
12
13    this.vpc = new ec2.Vpc(this, 'TheVPC', {
14      ipAddresses: ec2.IpAddresses.cidr("10.192.0.0/20"),
15      maxAzs: 1,
16      enableDnsHostnames: true,
17      enableDnsSupport: true,
18      restrictDefaultSecurityGroup: true,
19      subnetConfiguration: [
20        {
21          cidrMask: 28,
22          name: "public",
23          subnetType: ec2.SubnetType.PUBLIC,
24        },
25        {
26          cidrMask: 28,
27          name: "private",
28          subnetType: ec2.SubnetType.PRIVATE_WITH_EGRESS,
29        },
30      ],
31    });
32  }
33}
As a base AMI for all instances, I will be using the publicly available latest RH build: amazon/RHEL-9.3.0_HVM-20240117-x86_64-49-Hourly2-GP3. With the smallest possible instance size. Everything is sorted in file called bin/rhel.ts
 1#!/usr/bin/env node
 2import 'source-map-support/register';
 3import * as cdk from 'aws-cdk-lib';
 4import * as ec2 from 'aws-cdk-lib/aws-ec2';
 5import { SSHStack } from '../lib/ssh-stack';
 6import { ICStack } from '../lib/ic-stack';
 7import { SSMStack } from '../lib/ssm-stack';
 8import { SharedNetworkStack } from '../lib/shared-network';
 9
10const app = new cdk.App();
11
12const network = new SharedNetworkStack(app, 'SharedNetworkStack');
13
14const defaultInstanceProps = {
15	vpc: network.vpc,
16	machineImage: ec2.MachineImage.genericLinux({
17		// amazon/RHEL-9.3.0_HVM-20240117-x86_64-49-Hourly2-GP3
18		"eu-central-1": "ami-0134dde2b68fe1b07",
19	}),
20	instanceType: ec2.InstanceType.of(
21		ec2.InstanceClass.BURSTABLE2,
22		ec2.InstanceSize.MICRO,
23	),
24};
25
26new SSHStack(app, 'SSHStack', {
27	instanceProps: defaultInstanceProps,
28	vpc: network.vpc,
29});
30
31new ICStack(app, 'ICStack', {
32	instanceProps: defaultInstanceProps,
33	vpc: network.vpc,
34});
35
36new SSMStack(app, 'SSMStack', {
37	instanceProps: defaultInstanceProps,
38});
SSH
Let’s start with the basics. Regular SSH, what do we need to make this possible?
- SSH Key Pair
- ssh-server and ssh-client installed
- connection to configured port(default: 22)
- Bastion Host, as we’re simulating enterprise
setup
The initial assumption is, that we already have a key pair if not, please generate it with the following command:
1ssh-keygen \
2	-t ed25519 \
3	-C "aws@local-testing" \
4	-f ~/.ssh/id_ed25519_local_testing
Let’s back to code, we’re using a much too open Security Group for the Bastion host, regular in-VPC SG, and two hosts with the same ssh-key configured. That is why the created stack definition is rather simple:
 1import * as cdk from 'aws-cdk-lib';
 2import { Construct } from 'constructs';
 3import * as ec2 from 'aws-cdk-lib/aws-ec2';
 4
 5export interface SSHStackProps extends cdk.StackProps {
 6  vpc: ec2.Vpc;
 7  instanceProps: any;
 8}
 9export class SSHStack extends cdk.Stack {
10  constructor(scope: Construct, id: string, props: SSHStackProps) {
11    super(scope, id, props);
12
13    const theVPC = props.vpc;
14    const theProps = props.instanceProps;
15
16    // WARNING: change key material to your own
17    const awsKeyPair = new ec2.CfnKeyPair(this, "localkeypair", {
18      publicKeyMaterial:
19        "ssh-ed25519 AAAAC3NzaC1lZDI1NTE5AAAAIJxYZEBNRLXmuign6ZgNbmaSK7cnQAgFpx8cCscoqVed local",
20      keyName: "localawesomekey",
21    });
22
23    const myKeyPair = ec2.KeyPair.fromKeyPairAttributes(this, "mykey", {
24      keyPairName: awsKeyPair.keyName,
25    });
26
27    const tooopenSG = new ec2.SecurityGroup(this, "tooopenSG", {
28      securityGroupName: "Allow all SSH traffic",
29      vpc: theVPC,
30      allowAllOutbound: false
31    });
32
33    tooopenSG.addIngressRule(
34      // NOTE: we should use a more specific network range with
35      // ec2.Peer.ipv4("x.x.x.x/24")
36      ec2.Peer.anyIpv4(),
37      ec2.Port.tcp(22),
38      "Allow SSH",
39      false,
40    );
41
42    const defaultSG = new ec2.SecurityGroup(this, "regularSG", {
43      securityGroupName: "Regular in-VPC SG",
44      vpc: theVPC,
45      allowAllOutbound: false
46    });
47
48    defaultSG.addIngressRule(
49      ec2.Peer.ipv4(theVPC.vpcCidrBlock),
50      ec2.Port.tcp(22),
51      "Allow SSH inside VPC only"
52    );
53
54
55    const bastion = new ec2.Instance(this, 'bastion-host', {
56      instanceName: 'bastion-host',
57      vpcSubnets: {
58        subnetType: ec2.SubnetType.PUBLIC,
59      },
60      securityGroup: tooopenSG,
61      keyPair: myKeyPair,
62      ...theProps,
63    });
64
65    const instance = new ec2.Instance(this, 'host', {
66      instanceName: 'host',
67      vpcSubnets: {
68        subnetType: ec2.SubnetType.PRIVATE_WITH_EGRESS,
69      },
70      securityGroup: defaultSG,
71      keyPair: myKeyPair,
72      ...theProps,
73    });
74
75    new cdk.CfnOutput(this, "bastionIP", {
76      value: bastion.instancePublicIp,
77      description: "Public IP address of the bastion host",
78    });
79
80    new cdk.CfnOutput(this, "instnaceIP", {
81      value: instance.instancePrivateIp,
82      description: "Private IP address of thsh host",
83    });
84  }
85}
Then after executing cdk deploy SSHStack, and waiting around 200s, we should be able to see:
1
2 ✅  SSHStack
3
4✨  Deployment time: 200.17s
5
6Outputs:
7SSHStack.bastionIP = 3.121.228.159
8SSHStack.instnaceIP = 10.192.0.24
Great, now we can use our ssh key and ec2-user, for connection with our instance.
1$ ssh ec2-user@3.121.228.159 -i ~/.ssh/id_ed25519_local
2
3Register this system with Red Hat Insights: insights-client --register
4Create an account or view all your systems at https://red.ht/insights-dashboard
5[ec2-user@ip-10-192-0-6 ~]$ clear
6[ec2-user@ip-10-192-0-6 ~]$
7logout
8Connection to 3.121.228.159 closed.
Ok, for accessing our regular target host I strongly recommend using a regular ~/.ssh/config file, with the following content:
 1Host aws-bastion
 2  PreferredAuthentications publickey
 3  IdentitiesOnly=yes
 4  IdentityFile ~/.ssh/id_ed25519_local
 5  User ec2-user
 6  Hostname 3.76.116.53
 7
 8Host aws-host
 9  PreferredAuthentications publickey
10  IdentitiesOnly=yes
11  ProxyJump jump
12  IdentityFile ~/.ssh/id_ed25519_local
13  User ec2-user
14  Hostname 10.192.0.24
The good thing about it is that it’s very easy to configure Ansible with it. Our inventory file will be just simple:
1[bastion]
2aws-bastion
3
4[instance]
5aws-host
6
7[aws:children]
8aws-bastion
9aws-host
However, in the case of a real-world system, I would recommend using Ansible dynamic inventory, based on proper tagging.
props
- easy-to-implement solution
- standard SSH, so we can use Ansible just after deployment
- no additional costs(besides Bastion host)
cons
- exposing VMs to the public internet isn’t the most secure solution
- we need to manage SSH key pair
- we need to manage users
- we need to manage accesses manually, from the OS level
- no dedicated logging solution, besides Syslog
SSM Session Manager
Setting SSM based on documentation could be a bit more challenging, as we need to:
- install SSM agent
- configure role and instance profile
setup
 1import * as cdk from 'aws-cdk-lib';
 2import { Construct } from 'constructs';
 3import * as ec2 from 'aws-cdk-lib/aws-ec2';
 4import * as iam from 'aws-cdk-lib/aws-iam'
 5
 6export interface SSMStackProps extends cdk.StackProps {
 7  instanceProps: any;
 8}
 9export class SSMStack extends cdk.Stack {
10  constructor(scope: Construct, id: string, props: SSMStackProps) {
11    super(scope, id, props);
12
13    const theProps = props.instanceProps;
14
15    const ssmRole = new iam.Role(this, "SSMRole", {
16      assumedBy: new iam.ServicePrincipal("ec2.amazonaws.com"),
17      managedPolicies: [
18        iam.ManagedPolicy.fromAwsManagedPolicyName("AmazonSSMManagedInstanceCore")
19      ],
20      roleName: "SSMRole"
21    });
22    new iam.InstanceProfile(this, "SSMInstanceProfile", {
23      role: ssmRole,
24      instanceProfileName: "SSMInstanceProfile"
25    });
26
27    const userData = ec2.UserData.forLinux();
28    userData.addCommands(
29      'set -o xtrace',
30      'sudo dnf install -y https://s3.amazonaws.com/ec2-downloads-windows/SSMAgent/latest/linux_amd64/amazon-ssm-agent.rpm',
31      'sudo systemctl enable amazon-ssm-agent',
32      'sudo systemctl start amazon-ssm-agent'
33    );
34
35    const instnace = new ec2.Instance(this, 'instance-with-ssm', {
36      instanceName: 'instance-with-ssm',
37      vpcSubnets: {
38        subnetType: ec2.SubnetType.PRIVATE_WITH_EGRESS,
39      },
40      role: ssmRole,
41      allowAllOutbound: true,
42      detailedMonitoring: true,
43      userData: userData,
44      ...theProps,
45    });
46
47
48    new cdk.CfnOutput(this, "HostID", {
49      value: instnace.instanceId,
50      description: "ID of the regular host",
51    });
52
53    new cdk.CfnOutput(this, "hostDNS", {
54      value: instnace.instancePrivateDnsName,
55      description: "Hostname of the regular host",
56    });
57  }
58}
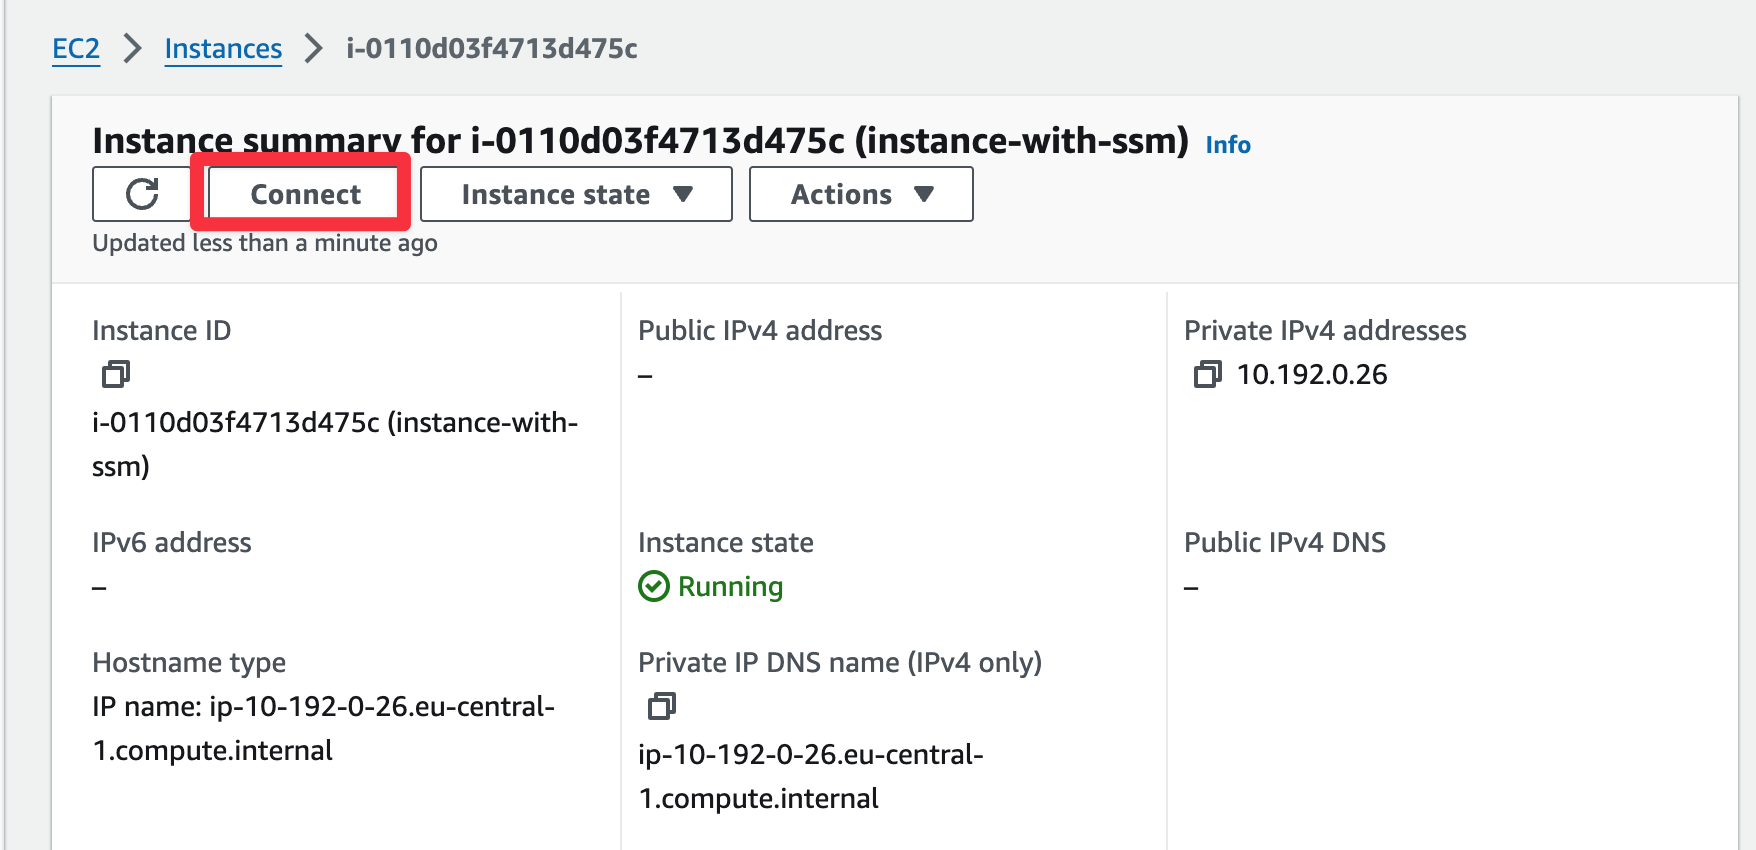
As you can see, we need to specify the role and instance profile(which can’t be displayed in GUI), and then we place the instance in a private subnet with specific user data and role. After a while we should be able to connect via CLI:
1$ aws ssm start-session --target i-0110d03f4713d475c
2
3
4Starting session with SessionId: kuba@3sky.dev-6n5goh43iisz45cmvpht54ize4
5sh-5.1$ sudo su
6[root@ip-10-192-0-26 bin]#
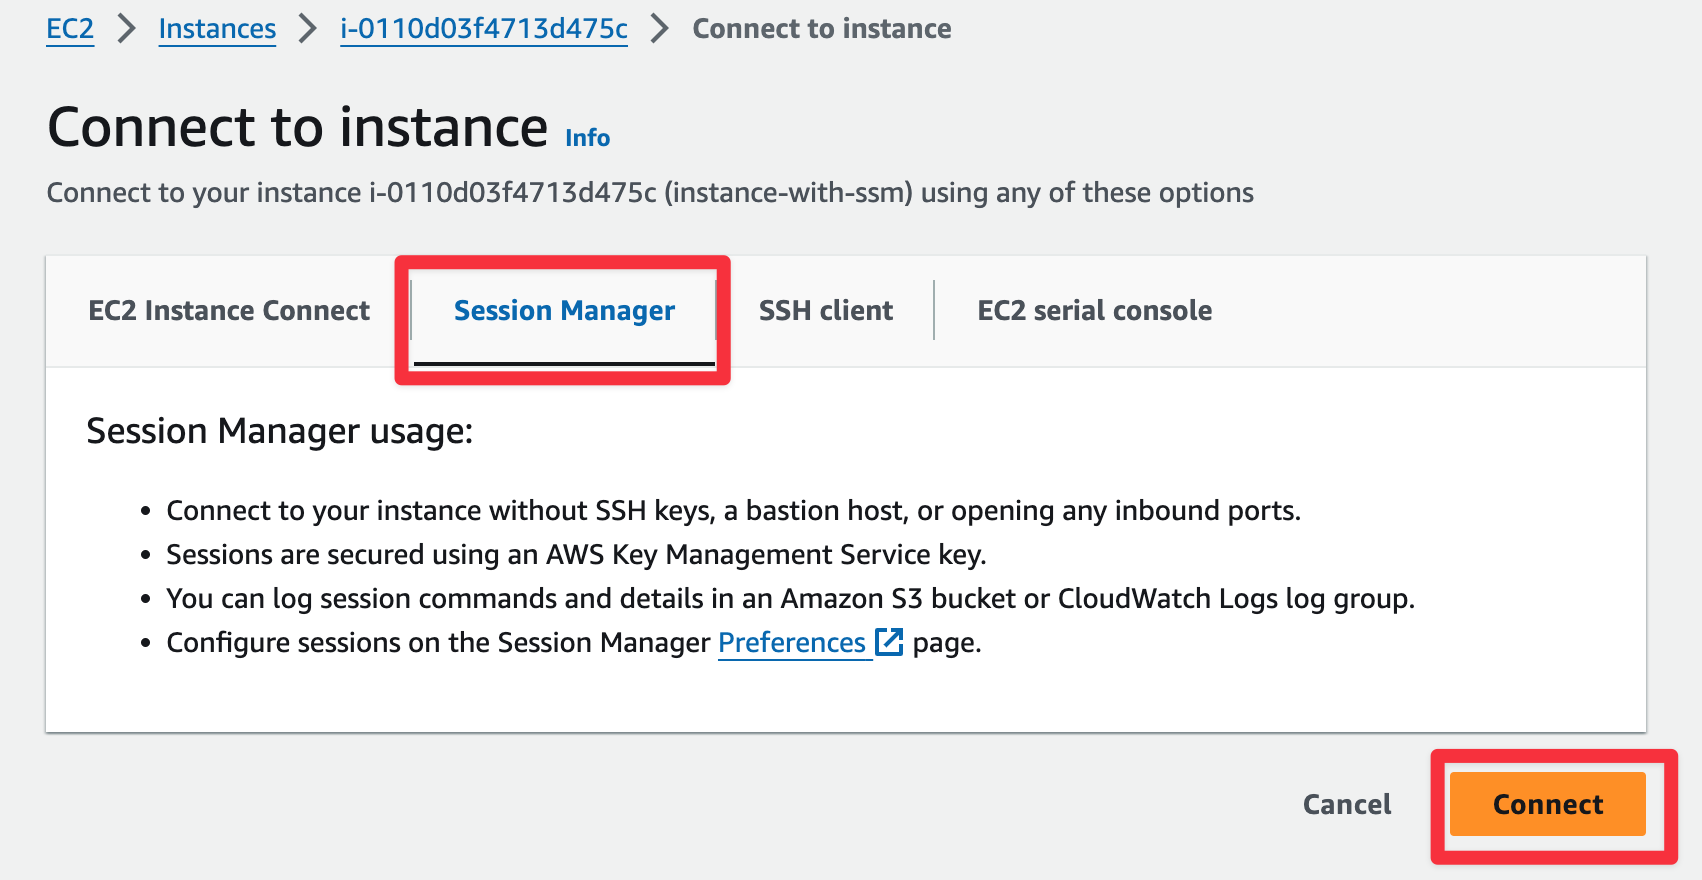
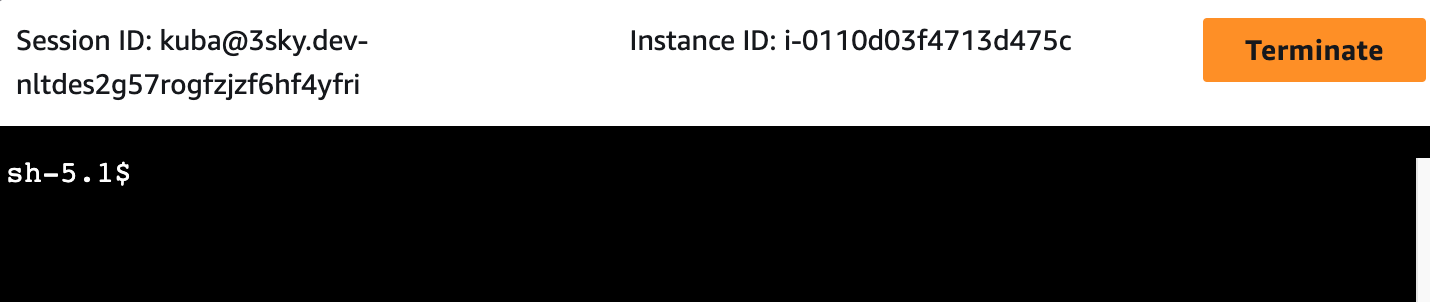
Or via GUI:
 |
|---|
 |
|---|
 |
|---|
bonus: cockpit
As we’re using the Red Hat system(however also available on Ubuntu etc), and SSM supports port forwarding we can utilize the power of the cockpit. For example, manage subscriptions, check security recommendations, and connect with Red Hat Insights. How to do it? Login to our instance, create an admin user with a password, and then start the port forwarding session.
 1# login to host
 2$ aws ssm start-session --target i-0113d03f4713d412b
 3
 4# become a root and create the needed user
 5sh-5.1$ sudo su
 6[root@ip-10-192-0-24:~]$ sudo useradd kuba
 7[root@ip-10-192-0-24:~]$ sudo passwd kuba
 8[root@ip-10-192-0-24:~]$ sudo usermod -aG wheel kuba
 9[root@ip-10-192-0-24:~]$ exit
10sh-5.1$ exit
11
12## start port-forwarding from the workstation
13$ aws ssm start-session \
14  --target i-0113d03f4713d412b
15  --document-name AWS-StartPortForwardingSessionToRemoteHost \
16  --parameters '{"portNumber":["9090"],"localPortNumber":["9090"],"host":["ip-10-192-0-24"]}'
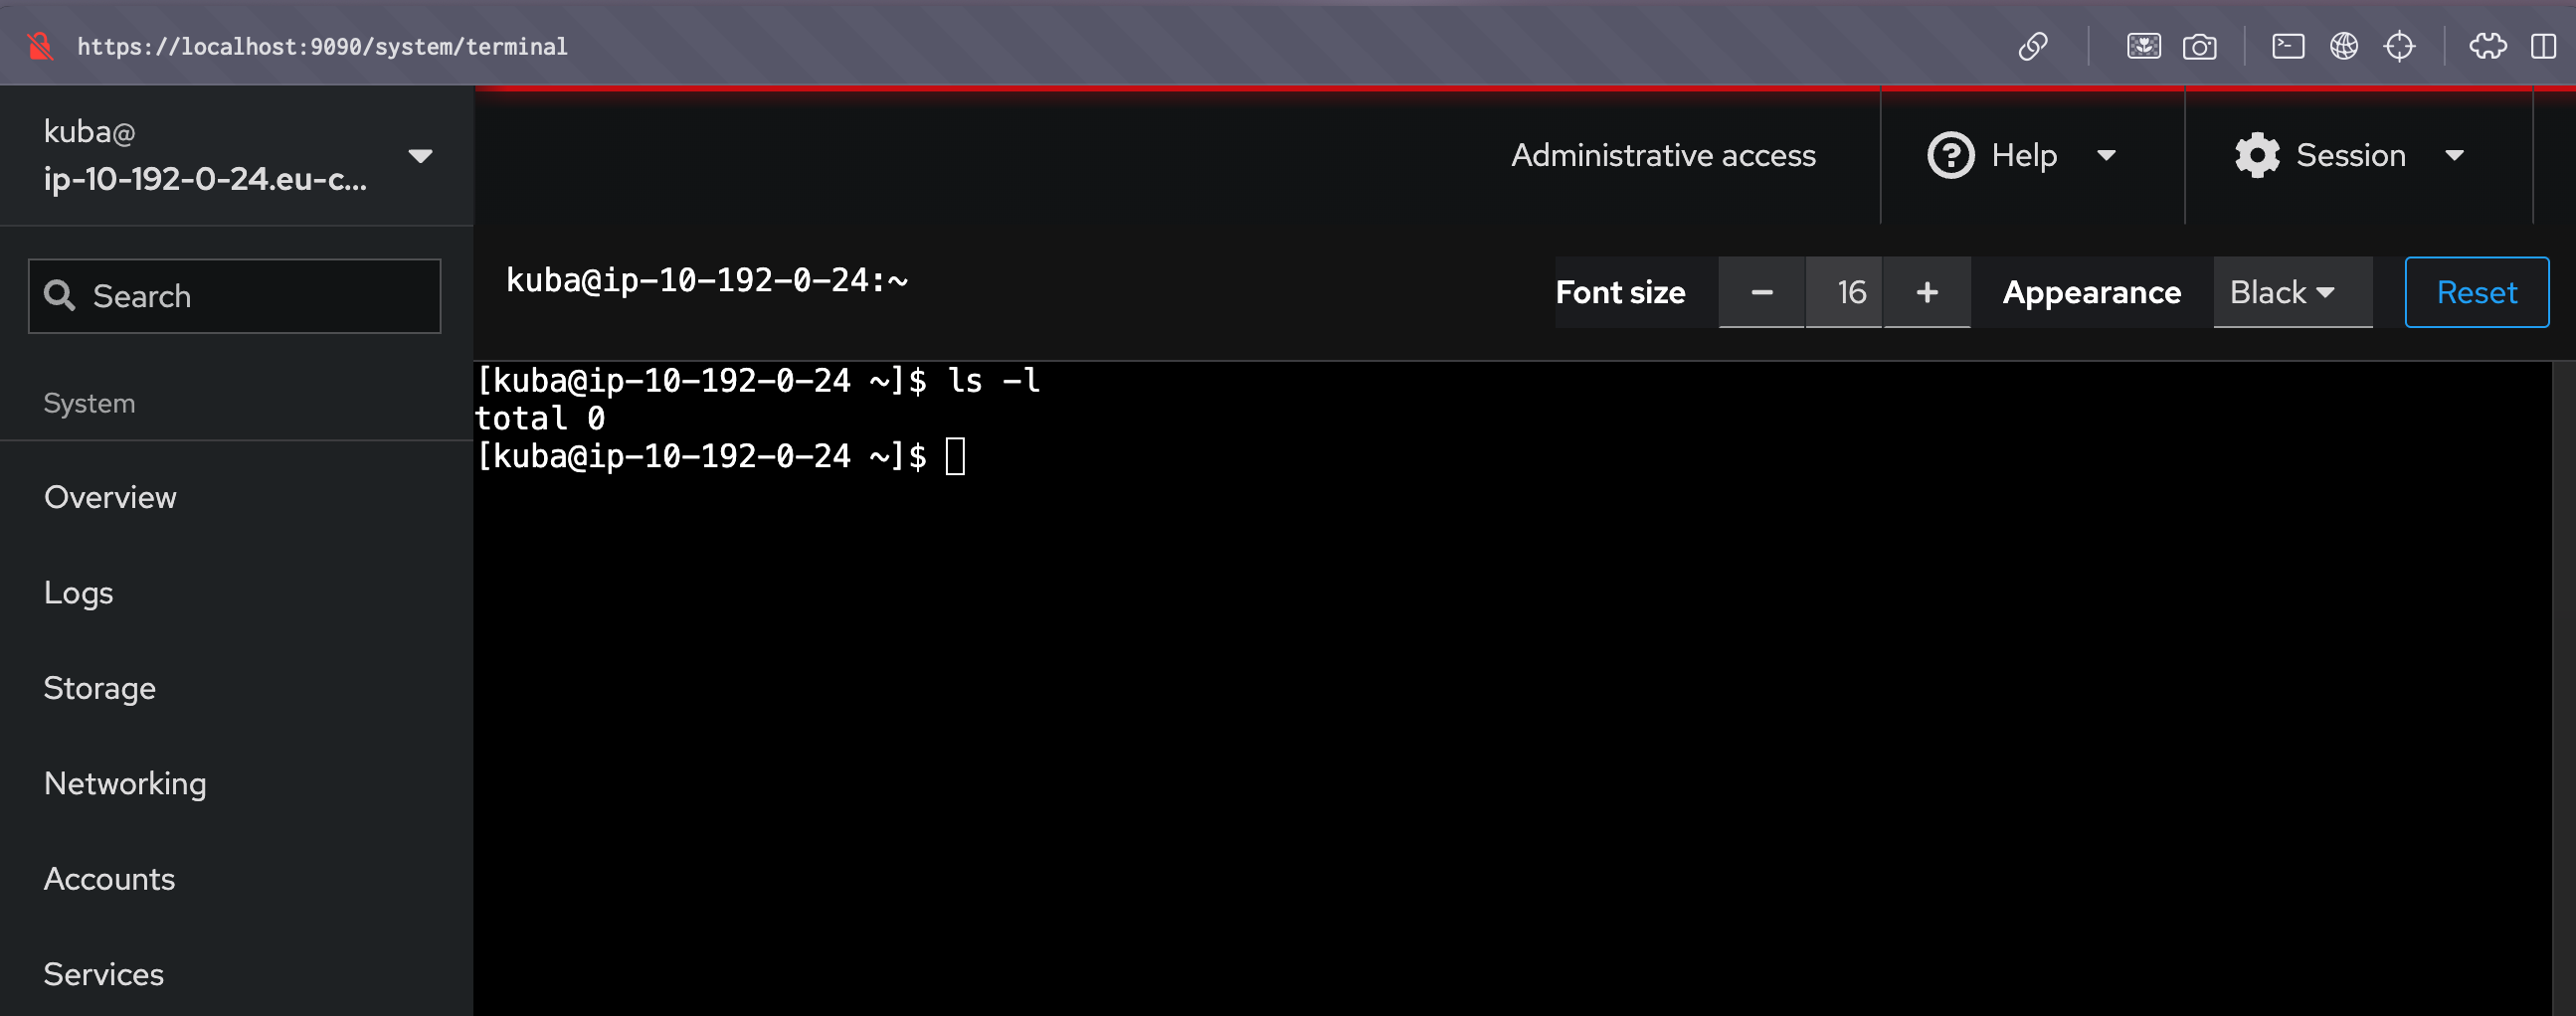 |
|---|
props
- straightforward setup
- allow the user to access the instance from GUI and CLI
- does not require using or storing ssh-keys
- has built in monitoring with CloudWatch
- provides the ability to restrict access based on IAM
- support port forwarding (useful for DB access)
cons
- using Ansible will be challenging(however supported)
- requires more AWS-specific knowledge than Bastion host
- in case of failure, push us to annoying debugging
EC2 instance connect
Our EC2 Instance Connect setup and configuration will be based on official documentation. Here are the main prerequisites we have:
- installed ec2-instance-connect packages on our host, which are not included in the default Red Hat build
- EC2 instance connect endpoint placed in the corresponding network
- open network connection to instance security group on TCP/22
- open network connection from EC2 instance to connect security group to instances on TCP/22
setup
Based on these prerequisites content of our file is as:
 1import * as cdk from 'aws-cdk-lib';
 2import { Construct } from 'constructs';
 3import * as ec2 from 'aws-cdk-lib/aws-ec2';
 4
 5export interface ICStackProps extends cdk.StackProps {
 6  vpc: ec2.Vpc;
 7  instanceProps: any;
 8}
 9export class ICStack extends cdk.Stack {
10  constructor(scope: Construct, id: string, props: ICStackProps) {
11    super(scope, id, props);
12
13    const theVPC = props.vpc;
14    const theProps = props.instanceProps;
15
16    const iceSG = new ec2.SecurityGroup(this, "iceSG", {
17      securityGroupName: "Instance Connect SG",
18      vpc: theVPC,
19      allowAllOutbound: false
20    });
21
22    iceSG.addEgressRule(
23      ec2.Peer.ipv4(theVPC.vpcCidrBlock),
24      ec2.Port.tcp(22),
25      "Allow outbound traffic from SG",
26    );
27
28    // WARNING: We need outbound for package installation
29    const iceSGtoVM = new ec2.SecurityGroup(this, "iceSGtoVM", {
30      securityGroupName: "Allow access over instance connect",
31      vpc: theVPC,
32    });
33
34    iceSGtoVM.addIngressRule(
35      iceSG,
36      ec2.Port.tcp(22),
37      "Allow SSH traffic from iceSG",
38    );
39
40    new ec2.CfnInstanceConnectEndpoint(this, "myInstanceConnectEndpoint", {
41      securityGroupIds: [iceSG.securityGroupId],
42      subnetId: theVPC.privateSubnets[0].subnetId
43    });
44
45    const userData = ec2.UserData.forLinux();
46    userData.addCommands(
47      'set -o xtrace',
48      'mkdir /tmp/ec2-instance-connect',
49      'curl https://amazon-ec2-instance-connect-us-west-2.s3.us-west-2.amazonaws.com/latest/linux_amd64/ec2-instance-connect.rpm -o /tmp/ec2-instance-connect/ec2-instance-connect.rpm',
50      'curl https://amazon-ec2-instance-connect-us-west-2.s3.us-west-2.amazonaws.com/latest/linux_amd64/ec2-instance-connect-selinux.noarch.rpm -o /tmp/ec2-instance-connect/ec2-instance-connect-selinux.rpm',
51      'sudo yum install -y /tmp/ec2-instance-connect/ec2-instance-connect.rpm /tmp/ec2-instance-connect/ec2-instance-connect-selinux.rpm'
52    );
53
54    const instnace = new ec2.Instance(this, 'instance-with-ic', {
55      instanceName: 'instance-with-ic',
56      vpcSubnets: {
57        subnetType: ec2.SubnetType.PRIVATE_WITH_EGRESS,
58      },
59      securityGroup: iceSGtoVM,
60      allowAllOutbound: true,
61      detailedMonitoring: true,
62      userData: userData,
63      ...theProps,
64    });
65
66    new cdk.CfnOutput(this, "HostIP", {
67      value: instnace.instanceId,
68      description: "Public IP address of the regular host",
69    });
70  }
71}
As you can see, the longest part is just user-data for downloading and installing needed packages. What is important in my opinion, we always should test it before deploying it on production. In case of errors with the installation process, debugging will be hard and will require adding a bastion host with keys, and instance recreation.
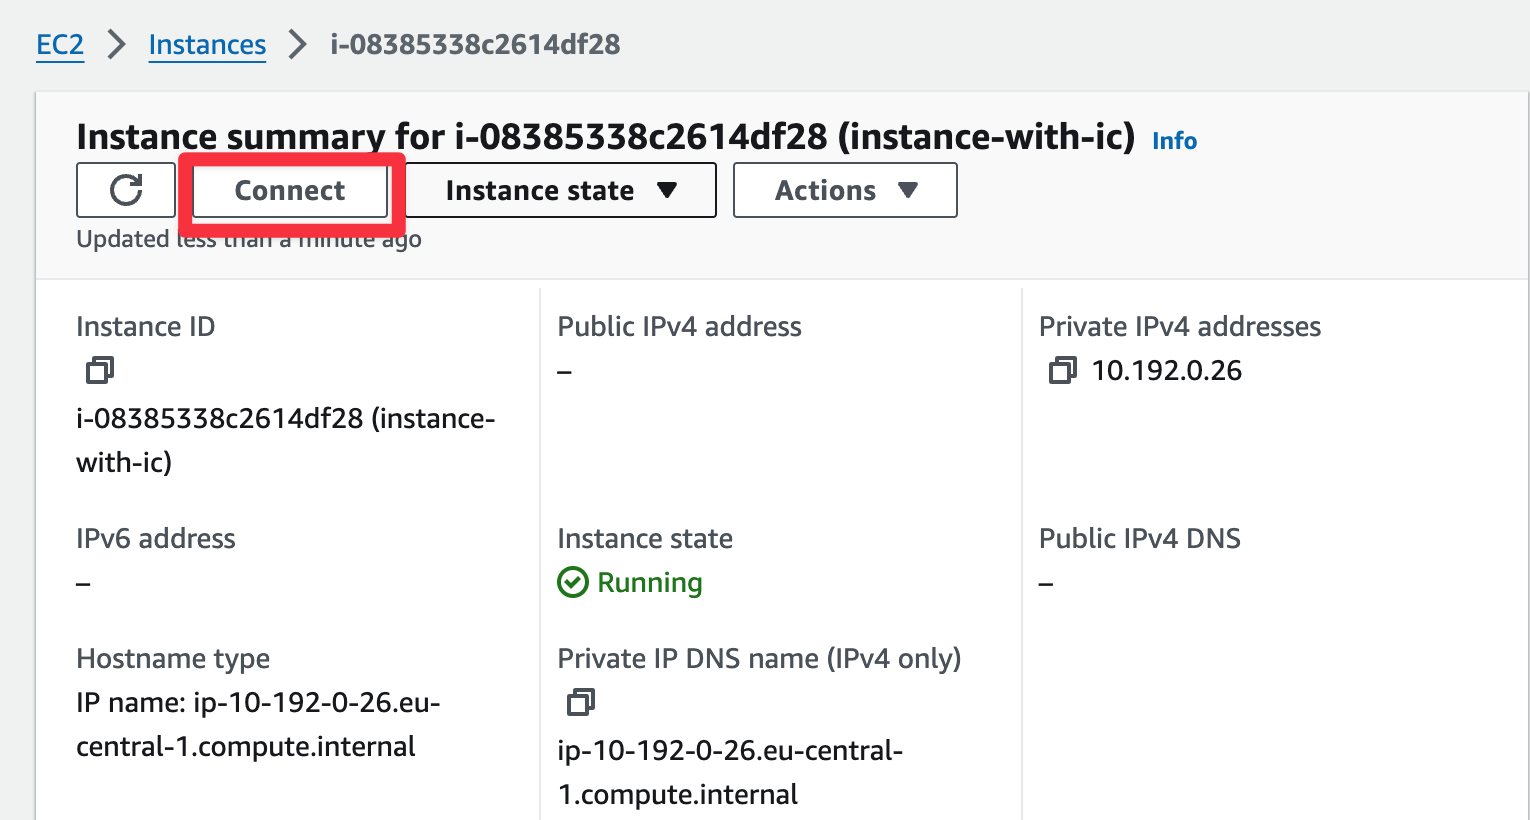
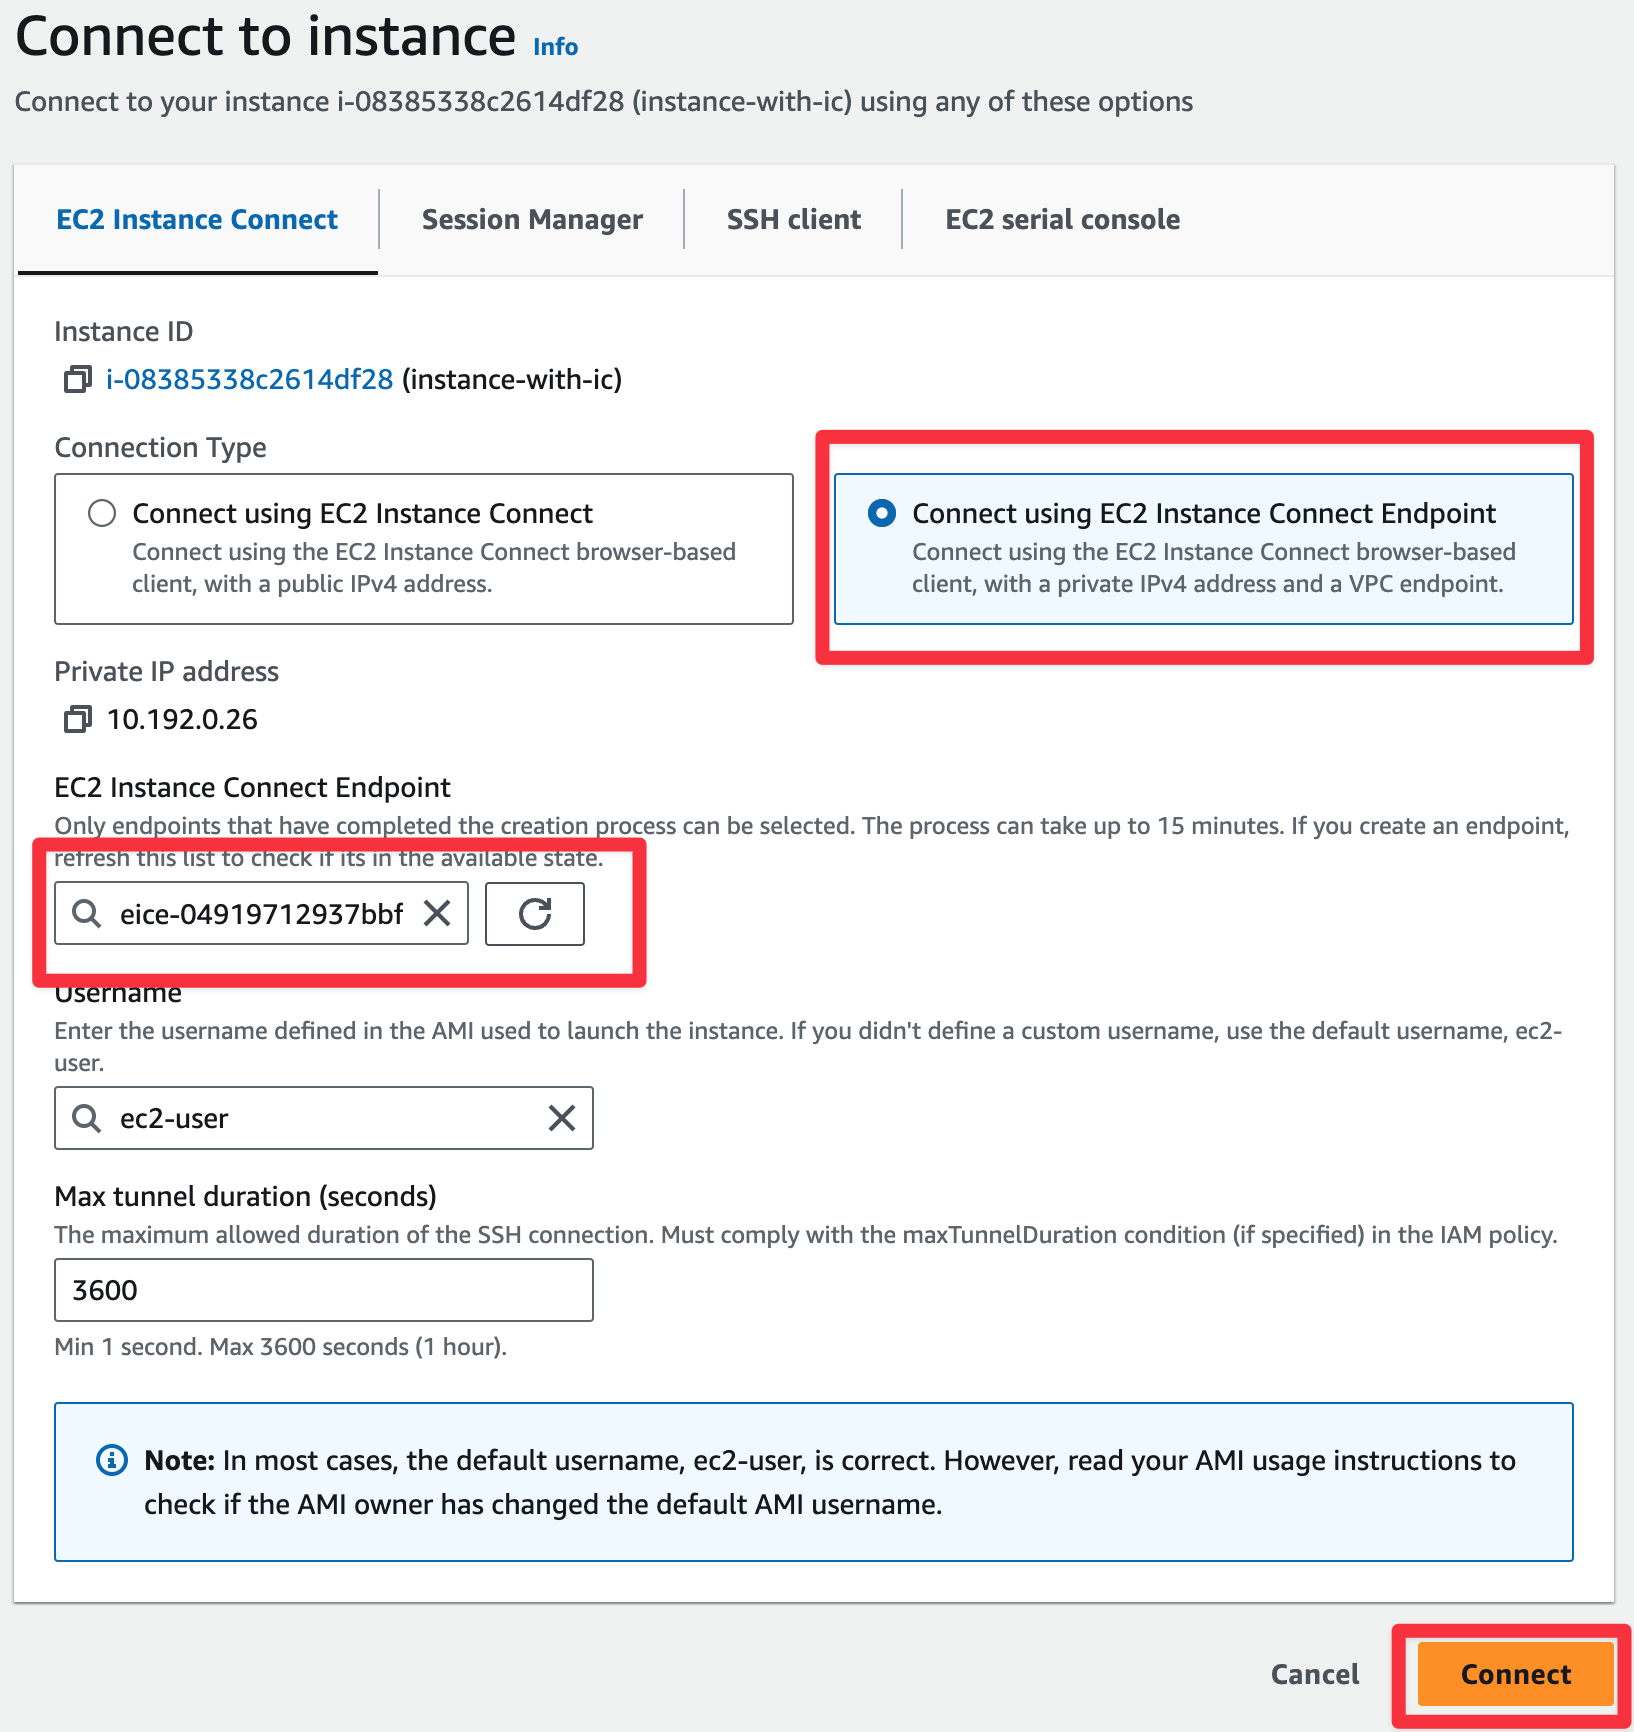
After deploying a stack(a bit longer this time), we should be able to access our instance with CLI:
 1$ aws ec2-instance-connect ssh --instance-id i-08385338c2614df28
 2
 3The authenticity of host '10.192.0.26 (<no hostip for proxy command>)' can't be established.
 4ED25519 key fingerprint is SHA256:BAxtwbZYKsK6hTJbvqOGgulGYftNQHZHMSpBkIGRTeY.
 5This key is not known by any other names.
 6Are you sure you want to continue connecting (yes/no/[fingerprint])? yes
 7Warning: Permanently added '10.192.0.26' (ED25519) to the list of known hosts.
 8Register this system with Red Hat Insights: insights-client --register
 9Create an account or view all your systems at https://red.ht/insights-dashboard
10[ec2-user@ip-10-192-0-26 ~]$
or via GUI:
 |
|---|
 |
|---|
 |
|---|
props
- straightforward setup
- allow the user to access the instance from GUI and CLI
- does not require using or storing ssh-keys
- has built in monitoring with CloudWatch
- provides the ability to restrict access based on IAM
cons
- using Ansible will be very challenging(no official support or plugin)
- requires more AWS-specific knowledge than Bastion host
- in case of failure, push us to annoying debugging
Final notes
- network setup was simplified; one AZ; 2 subnets
- security groups were to open, especially outbound rules(due to package downloading)
- SSM could be used over endpoints as well:
- com.amazonaws.:aws-region:.ssm
- com.amazonaws.:aws-region:.ssmmessages
- com.amazonaws.:aws-region:.ssmmessages
- we should use already pre-built AMI to avoid this issue
- repo as always can be find here
Summary
As you can see setting up RHEL in AWS isn’t such hard, for sure it’s more expensive and requires ec2-connect-instance or SSM agent installation(Amazon Linux does not), but if we’re going to use RHEL in the cloud, probably we have good reason to do so. For example, great support, Insights, or Cloud Console, but my job was to show possibilities and do it with style.